
1981 Honda CX500 left for dead in the weeds...notice the ominous trash can in the background.
These bikes are pretty ugly in stock form, but they have a great motor and drive train - sort of like a water cooled Moto Guzzi. I thought it would be a good challenge to see if I could resurrect this derelict motorcycle and make an attractive, vintage inspired, cafe racer out of it. With the shaft drive and water cooling it should make a reliable daily rider.

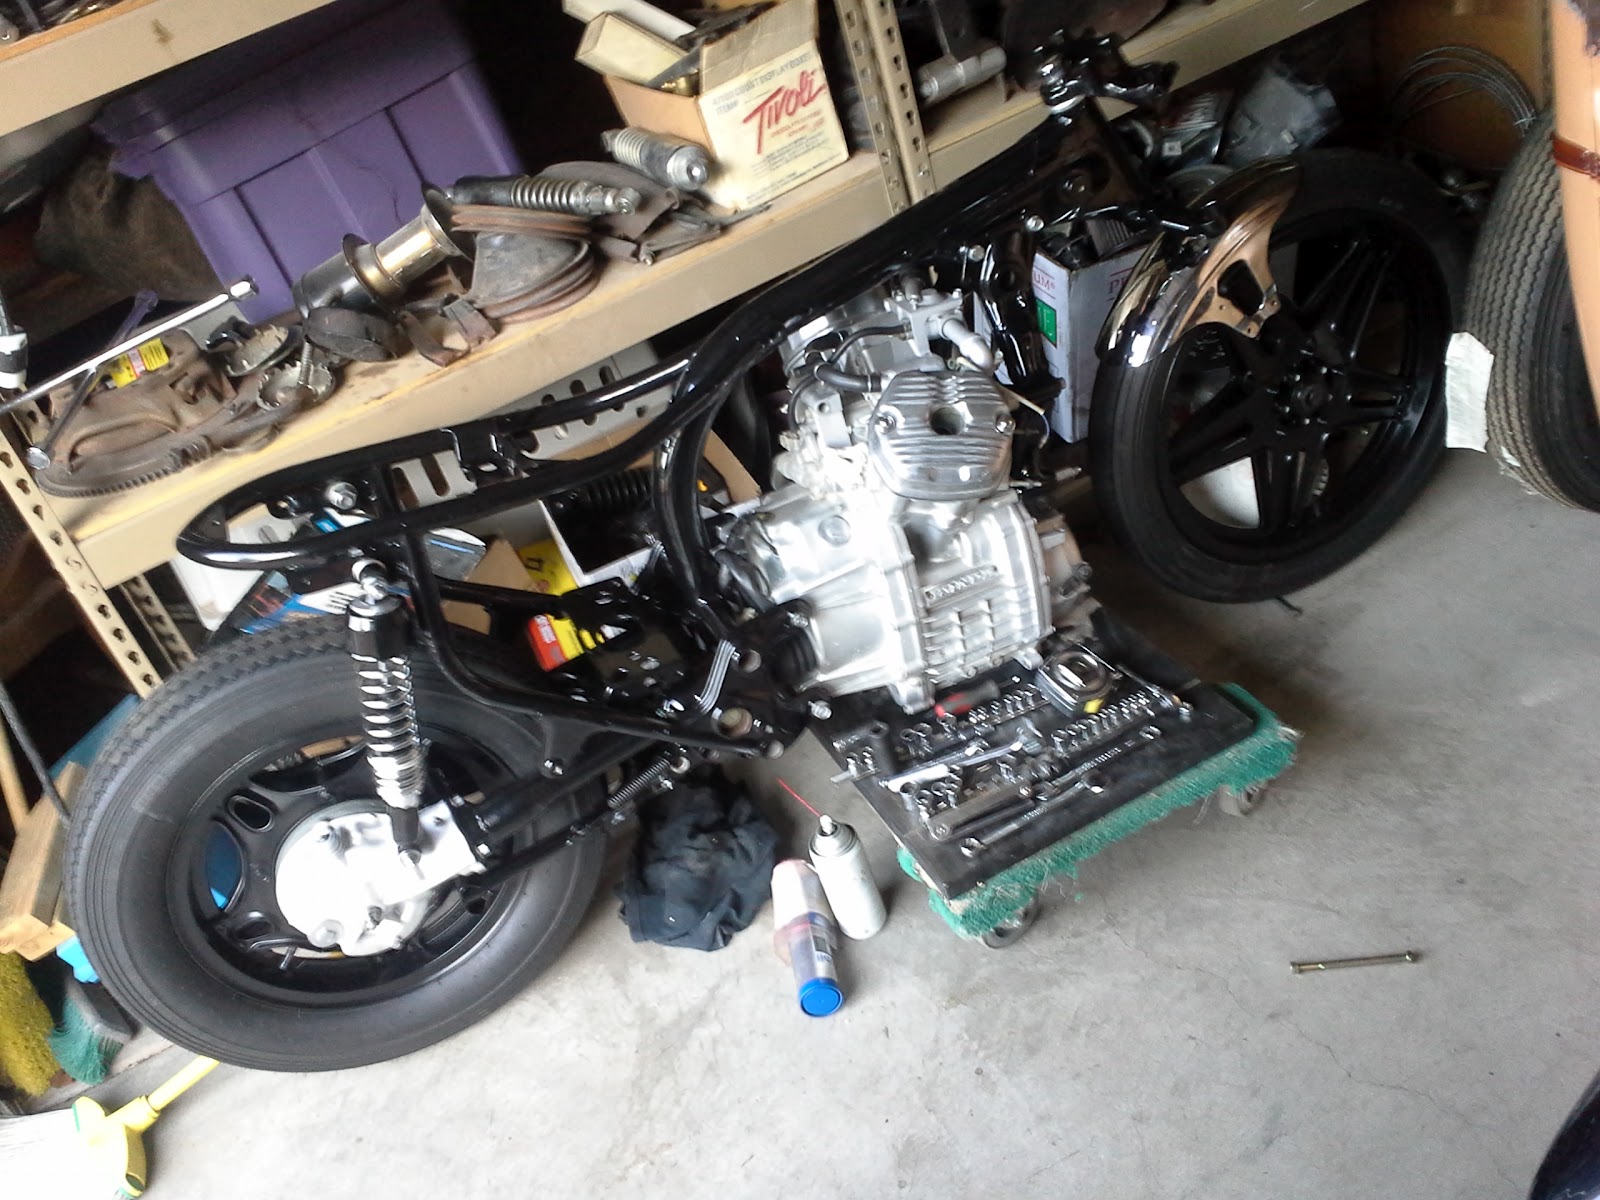
CX striped down to bare essentials, mocked up with bars and tank.

I decided to modify the awkward frame and cut off seat support/shock mounts.

I left the front of the seat support and added a new seat loop with better lines that work with the new tank.

Here is the removed section of frame

This is the new section of frame mocked up before welding.


Tacking seat loop in place.

This is the frame before final welding, including new mount tabs for shocks, blinkers, and side plates.
I just need to finish welding and then off to powdercoat.

Motor before clean up/inspection

The frame and stock wheels back from powder coat. I replaced the old worn out shocks, cut down the stock fender, and mounted some new rubber.

I also powder coated the modified fork lowers. Now we have a roller!

I stripped the paint, added mounting tabs, and started body work on the tank. Fabricated seat pan, mounted and shaped the foam.

I made a two into one exhaust system for better performance and sound.

Fabricated brake pedal and foot pegs.


Fabricated new shift pedal.

New coolant overflow canister.


I wanted to keep the handle bars clean so I built a dashboard for swithches into the tank design

...after body work.


Now it's time to wire it up and see if it runs!

I chucked the old harness for a new compact, hi tech unit.

I mounted the harness under the CDI/coil/regulator tray. The old coils were in sad shape so I replaced them with new smaller units. It should all fit under the seat nicely.

Routing the wires to their destinations can be a bit confusing. Once sorted and connected the installation should be a bit cleaner.

I pulled all the necessary wires through the frame and out the headlight shell so I can hide all connections in the shell.

These are the switches I will mount in the tank "dashboard". Kill switch, hi-lo beam, blinkers.

This wiring module will handle all lighting, starting, and circuit breaker functions. No more fuses.

The stock CDI and voltage regulator will handle engine management and charging.


This is where I mounted the starter solenoid, where the over flow tank used to be, between the back of the motor and frame. It works with the key now.

I am using an automotive style ignition switch. That eliminates the need for a start button.

I mounted the ignition switch on the left "number plate". I will have graphics there of some sort, not sure what yet. Any ideas?

Blinker and stop/running light wires.

Gas tank with dashboard.


Switches mounted.

Underside

All wires a are color coded by function.

Shrink tubing to clean things up.

This is what dash wires look like mounted on bike.

Dash switches. Center: L/R blinkers (indicators for you guys across the pond), Left: hi/lo beam, Right: kill.


all the connections fit nicely inside the headlight shell.

I hooked up the battery and everything works! Headlight, tail light, brake, blinkers (indicators) front and rear.


Turned out pretty clean, much simpler than the stock harness.
Now I just need to fab the license plate holder/ brake light mount, rebuild carbs, and build throttle cables, then the bike will be finished.
Today I rebuilt and mounted the carbs.


I used the stock choke cable and made it really short so I could eliminate it from the bars.

First I replaced the air cut off valves.

Then I separated the two carbs so I could replace the o rings on the fuel supply tube and the accelerator pump tube.


After I replaced those o rings I put the carbs back together. I found it easier to work on them when attached.

Since I had the float bowls off I rejetted the carbs to compensate for the new air cleaners and less restrictive exhaust. 90 slow jet, 120 main jet.

New float valves


Off with the tops...

Needle looked good so I left it alone

After assembly I bench tested for leaks.

Fuel rig. No leaks!


I also checked to make sure the accelerator pumps were squirting.

New o rings on intake boots.


Everything fits, now time to build some throttle cables.

This is the kit I will be using to build the throttle cables.


I am using a Domino throttle control. These are made for dirt bike applications, but since I am not using any buttons or switches on the bars I can use this simple set up. I like these because they are light, simple and sturdy.


First you route the cable housings.


Then you measure for length. I marked them with tape.

Cut to length.


These are the ends that fit in the throttle control.


Feed the cables through the housings.


Throttle assembled...

...and mounted.


These are the fittings that go on the carburetor end of the cable.

Cut the cables to length and slip fittings over end.

I found it easier to take the cable/throttle assembly off for soldering the ends.

Flare the cable ends and solder the joint.

Finished install, now I can finally start it!


I started it yesterday, it runs great. The sound is ferocious with the two into one and glass pack muffler. Deep and throaty. I'm sure my neighbors appreciate it too.

Some finishing touches on the paint today...


I am extremely impressed with your craftsmanship. The jog in the CX frame has always been a bone of contention for me. I adapted to it in my first build, but removing it the way you did is the direction I would like to take with my next CX build (these things just kinda reproduce, ya know?). You definitely have my wheels turning.
ReplyDeleteThe spoked wheel modification is awesome! I have the 16-in rear wheels on my bikes, the same that is currently on your build (stock Comstars). Do you think the smaller rim diameter would make the wheel look a little strange? Your 18 looks great, but just wondering if an inch shorter spoke would look out of place?
I Google’d the Ultima wiring harness. I see they’re actually manufactured for Harley’s. Were there any issues utilizing them on your CX build? Does the flasher module work with LED brake lights and turn signals? This loom could cure a lot of my ills.
Can you provide some info on your coils? Both of mine are cracked, might as well go for it while she’s torn apart.
Again, terrific build and great foresight. Looking forward to more!
-to (aka, flyinelvis
flyinelvis@me.com
This comment has been removed by the author.
DeleteOh, and the coils are made by Emgo i think. They are CDI compatible, made mostly for dirt bike applications, but should work fine on the CX. They definitely fit better.
Deletecool project. Best CX500 so far!
ReplyDeleteThanks Marco! Wait until you see the full photoshoot. These are just phone camera shots.
Deletecant wait to see it! will follow your build
DeleteHoping to see an update on your build. How did the Ultima harness work for you? Have you mounted the wheels? Intriguing build, curious minds need to know!
ReplyDeleteHey FlyinElvis, good to hear from you. The harness is working out great. I was doing quite a bit of wiring yesterday. It is a time consuming process and I kind of got sidetracked on the spoke wheel thing. I will post photos today. I might be able to finish in next couple of days. Thanks for tuning in.
DeleteMotoSythesis
Excellent write-up! I think I'll adopt the Ultima harness on my next build. Spent the weekend slicing and splicing on the existing harness. A bit of a pain with the retrofit. Picked up a Vintage Connections, connector kit, it worked wonders (once I figured out how to operate the crimping tool). Highly recommend it. Thanks for providing such detailed information, no matter how intimate you get with these bikes, there is always something to be gained from looking over the shoulder of others. Best of luck (I may look into those spoke wheels at some point) and keep us posted on your project(s)...
ReplyDelete-tom
Wow! Great build Jerry. Has to be the nicest CX I've seen. Congrats! And excellent blog and details. I wanted to ask; How did you clean up the engine? It looks great.
ReplyDeleteMarc
Thanks Marc,
ReplyDeleteI just used degreaser and a toothbrush to get in all the tight spots. I replaced a couple of gaskets that were leaking. Thanks for checking out my blog.
Jerry
hi jerry
ReplyDeletei just saw your cx on ottonero's blog
and i fell in love with it!
it's a really nice project...
great details...
except...
those side number plates!
PLEASE... TAKE THEM OFF!!
:))
u put so much work on this bike, and those plates seem to be there just becoz u had to cover that space after somebody stole the "original" ones!
(by "originals" i mean: something u could fabricate or maybe adapt from another bikes... something with a certain design... to much the rest of the bike!)
MY COMPLIMENTS AGAIN...
and i hope i havent got u upset with my comment..
CHEERS!!
I know they look a little out of place right now, but wait 'til you see them with the graphics. Once the final paint and graphics are applied it will all tie in together nicely. Stay tuned for final result and full photoshoot. Thanks for checking out my blog.
ReplyDeleteMotoSynthesis
Nice work Jerry. A lot to like with this bike. The switches on the tank, the paint, the workmanship etc are fantastic. The way you handled the rear frame and the side covers are interesting. I'd love to see the proper pictures. Not sure the dodgy phone pics are doing it justice. I'll be featuring it on the blog in the next few days.
ReplyDeleteHi RexHavoc
DeleteThank you for checking out my blog. I will have better photos in a few days. I can shoot you an email when they are ready.
MotoSynthesis
WOW!!! It looks fantastic! I have a CX500 that I've been fighting with the wiring harness for over a decade. Where can I get an unit like that? I live in Utah and there aren't many local sources, maybe online somewhere?
ReplyDeleteHey Breno,
DeleteThank you. You can get that wire harness from www.jirehcycles.com . It is designed for custom builds, mostly Harley. I have found it works well for most any application. It controls all lighting and circuit breaker functions. I threw out my entire CX500 harness and it works great, much cleaner. You just need to keep the CDI, voltage regulator, and solenoid. The bike runs perfectly.
MotoSynthesis
Would that be the ultima Plus wiring kit? cheers
ReplyDeleteYep, that's it.
ReplyDeleteGreat build buddy, love the grips what are the make and model
ReplyDeleteThose are vintage repro grips called "Donkey Dicks", found 'em on ebay.
DeleteGreat job and great story and pics. I have built a CB750 stock,CB350 Café & a SR500 Café and know all the time and work you have put into this build.. Great job. Will call when I do a CX 500 build..Soon..
ReplyDeleteWhat coils did you use? I really like this build and am considering stealing your wiring ideas.
ReplyDeleteEmgo.
DeleteExcellent post! I must thank you for this informative read. I hope you will post again soon.
ReplyDeleteKind regard
Wire Harness Manufacturers
This is fantastic! I will be starting a CX500 build soon, and will definitely be using some of your methods. Tell me more about the Venhill cable kit, how did you solder the barrels? I did not think you could use a home soldering kit (Iron or Gun).
ReplyDeleteThanks!!!
Michael G
I used a propane torch to solder the cable ends.
DeleteExcellent post, the pics were really wonderful. My favorite thing by far is the switch placement, that's so genius and looks so nice once finished. Switch placement can be a pain and your solution is definitely something I will keep in mind in the future. Great work!
ReplyDeleteI would like to recommend your article .. you can also refer Wire Harness Manufacturers
ReplyDeleteGreat stance on that machine. Which sizes did you go with?
ReplyDelete18" rear/19" front
DeleteAmazing build coverage and attention to detail. We've just recently started our next build, a CX500c and will definitely reference yours! Thanks again for such an outstanding build!
ReplyDelete- Rubber & Iron
http://caferacerspecial.blogspot.it/2014/06/honda-cx500-cafe-racer-by-motosynthesis.html
ReplyDeleteNice post! Thanks guys.
DeleteJerry
Do you have any tips for wiring the ultima harness with the cdi unit??
ReplyDeleteYes. Use the harness for all lighting and start functions. Use the stock module and regulator for ignition. Makes it simple.
Delete... and charging.
DeleteThanks for looking.
Jerry
Hey there Jerry. I myself just received a CX500 as a project. My question for you is how you made the gear shifter? The one that is on there now just doesnt make sense on how its suppose to work. Can you please contact me at bryanbissonnette@yahoo.com?
ReplyDeleteThanks
DeleteIt is a strange shifter - perpendicular to the bike. It works well, though.
I used some 3/16" x 1 1/4" flat bar for the lever and a 1" piece of 1/2" tubing for the tip.
Jerry
Hey Jerry did you have to do anything with the rear-end? Was there any work required to rebuild the final drive, brake drum, etc? Email me again at bryanbissonnette@yahoo.com if you wouldnt mind.
ReplyDeleteWow , What an article with all the nice snaps of your bike, Great Going Man, All the best for your terrific ride on your bike, once its up and running smooth
ReplyDeleteThanks Thomas. I'm glad you enjoyed the article.
DeleteI used the stock hub so everything just bolts right back like stock; no mods to the brakes or drive train needed. Thanks for looking.
ReplyDeleteHello!
ReplyDeleteI really like your build. Well done!
I recently bough the same wiring harness as you, but haven't installed it yet. There are some things I'm wondering about:
Is the flasher relay working properly for you with a non-harley turn signal switch (i.e. non "click"- switches)?
Do you need to add/keep any fuses, or is the built-in circuit breaker enough for the whole motorcycle?
Any idea if there will be a problem running this harness with 13-14,7V batteries?
Thanks alot!
Everything works well, including turn signals. You only need one fuse for battery power to CDI, all other circuit protection is handled by the internal breakers.
DeleteYou need momentary on switch for signals.
DeleteHi, love this! What tank did you end up using?
ReplyDeleteHey Matt,
DeleteThanks, glad you liked the article. The tank is from an early 70's Kawasaki dirt bike.
stumbled over this build - very very impressive and inspiring, great work!
ReplyDeletevery very impressive, great work!
ReplyDeleteI am really impressed!!
ReplyDeleteThanks for sharing!!
I feel really inspired to get my hands dirty and start working on a similar (simpler) project
Sweet! Did you lower the suspension?
ReplyDeleteBeautiful build!!
ReplyDeleteI'm building my Cx 500 as of now, and have just purchased the same wiring system and i have a couple of questions. I'm also using the automotive style ignition switch:
1. How did you wire the starter Solenoid? more specifically the Green/red and the Yellow/red wire?
2. Also, what did you do with the Green and Black wire comming from the regulator?
3. and last, what did you do with the black/white wire from the CDI?
Hope it's not to confusing, it would really help to get clarified :)
Thank you very much in advance
Great build, lots of inspiration!